INTRODUCTION
Dad (Keith Inglin) is always drumming up ideas for new content to share on the XCEL website. If you can’t tell, he always strives to make the site the best it can be and treats it as one of his hobbies after formally stepping away from driving an XCEL a year or so ago. He asked that I come up with an article for some off-season content and I thought that sharing some thoughts about lettering your own car may interest some drivers and teams. Accordingly, this article will discuss basic equipment and materials needed to letter your car, as well as an overview of the general process.
There are really three ways to “letter” a car from my perspective: (1) Old-school hand painting; (2) Vinyl “Wrapping”; and (3) Vinyl lettering. Method (1) requires extraordinary skill and in this day and age, is quite rare given the capabilities and efficiencies of using vinyl. Vinyl “wrapping” under Method (2) requires a very expensive, large format vinyl printer, which most of us are not interested in buying to letter a car once or twice a year. That leaves only method (3), which involves cutting individual pieces of vinyl and placing them on the car (often using multiple layers and colors to get the desired look). This article focuses only on method (3).
As an introductory disclaimer, lettering your own car is not easy and I don’t claim to be amazingly good at it. I letter my cars only because I find the process fun and rewarding, and there is certainly some cost savings by doing your own stuff. The artists and professionals who do this for a living are super talented and really know what they are doing. If budget is not a concern, I think you will ALWAYS get a better product by hiring one of the many design shops that do this full time.
All that said, let’s jump into it…
EQUIPMENT AND MATERIALS
THE VINYL
What vinyl should you use? The answer to that question depends upon the application. I use two different types on my cars.
Wrap Vinyl – Wrap vinyl is more expensive than the “calendared” vinyl discussed below, but it is the only type of vinyl that can be used around complex curves and shapes. It stretches well (particularly with a bit of heat) and is super forgiving. Fortunately for us, the XCELs do not have many complex curves and the majority of the body is simply a flat surface. This means that you probably don’t need much wrap vinyl, if any at all. However, if your design requires large pieces of vinyl, such as one base color that is going cover the entire hood, it will be much easier to apply wrap vinyl without any bubbles or wrinkles versus trying to use calendared vinyl for that purpose. I purchase my wrap vinyl from MetroRestyling, as I find their prices and shipping to be the best. From a product perspective, I prefer “3M 2080 Vinyl Wrap” film. That product comes with a clear protective layer which is removed after applying the vinyl. This lets you use firm pressure with your application squeegee without scratching the vinyl itself.
Calendared Vinyl – Calendared vinyl is way more affordable and can be used for almost everything on the XCEL. It does not stretch well, so you will need to very careful when applying it. I purchase my calendared vinyl from H&H Sign (I don’t personally know these folks, but they have great customer service and support racing) and I use Oracal 651 as the product.
THE CUTTER
A vinyl cutter (not to be confused with a vinyl printer) is what you will need to cut out your graphics and shapes. These things are actually quite affordable. I have a basic 24 inch one (US Cutter MH 721-MK2) that I bought used on Facebook Marketplace for $75 bucks. It works great and there are others in the same price range that will do just fine (for example, a Cricut machine).
COMPUTER SOFTWARE
You will need to have computer software to send your “cutfile” to your vinyl cutter. I use Vinyl Master Cut, which is only around $60. For most basic graphics, I simply design the logo or shape in Vinyl Master Cut itself. However, for more complex graphics and logos and as your graphic design skills improve, you will likely want fancier vector software (I use Adobe Illustrator). Either way, Vinyl Master Cut should be plenty to get you started.
APPLICATION TOOLS
You’ve designed your graphic, you’ve cut it out using your vinyl cutter, and now you want to put it on your car. What do you need? I get by with nothing more than knifeless tape, transfer tape, an Exacto knife, and a basic application squeegee. I’ll talk more about the application process below. Specifically, the stuff I use is linked below:
Knifeless Tape: 3M Knifeless Finish Line Vinyl Wrap Cutting Tape
Transfer Tape: 12″ GT Plus Medium Tac Clear Tape (hhsignsupply.com)
Squeegee: Orafol Grey Squeegee (hhsignsupply.com)
Exacto Knife: X-ACTO XZ3601
THE PROCESS
STEP 1 – DESIGN
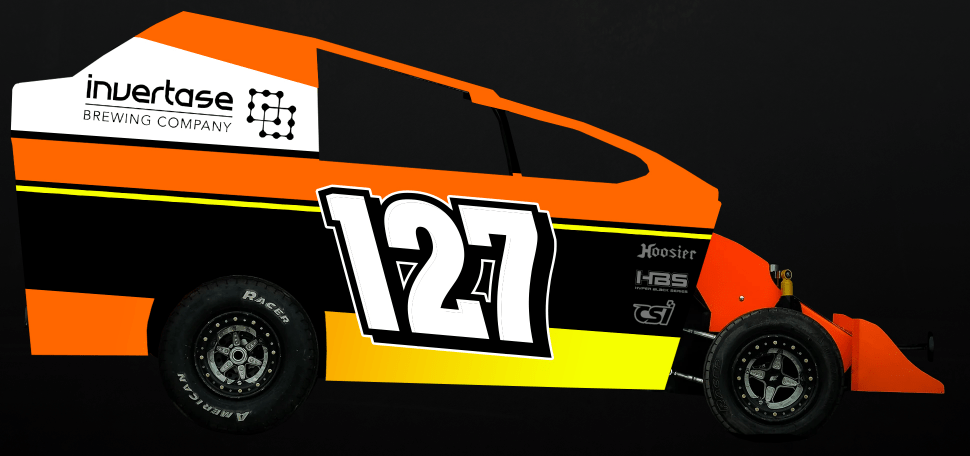
The first step is to fully design your car. You can do this the old-fashioned way on a physical piece of paper, but more realistically, you would draw the car on a computer. Designing is a painstaking process and I often need to “walk away” and come back the next day to start fresh. With enough time, you should be able to come up with something you like even if you are not an artist (I am not…).
As an example, below is a rough sketch of what I had prepared in Adobe Illustrator for this year’s XCEL before I dove in and started to actually letter the car. I often find that I make certain tweaks to the design once I start actually doing the vinyl work, and you can see these differences if you look closely at the end result pictured at the end of the article and compare it to the below picture.
STEP 2 – APPLYING YOUR “STRIPE PATTERN”
Before I cut out any of the sponsor logos, numbers or any other “graphics” that are going on the car, I “stripe” the car. I don’t know if that is the right technical term, but when I refer to “striping”, I mean putting the basic design elements onto the car. In my example above, the “stripes” would mean the basic orange, white and yellow shapes that form the basis of the design on the 127. Your “stripe” package will, of course, be specific to you and will be the foundation of what you design in Step 1 above.
Over the years, I have “striped” my car in a variety of ways. I used to try and hand cut the vinyl pieces to the appropriate shape and then put them on the car. DON’T DO IT THIS WAY. It is almost impossible to stick the vinyl in the right spot on the car the first time and you will just end up throwing vinyl away and getting really frustrated.
The second approach I tried was to put large pieces of vinyl onto the car, and then use a pencil to draw the lines where I had to cut those large pieces to get the desired shape. This approach works OK, but has a couple downsides: First, if you screw up your cut, you’ve now placed a razor cut line on your body panel that is going to be visible to the whole world. Second, it dulls your Exacto blade super quick because you are cutting directly on the metal panel. You will go through Exacto blades like crazy.
That leads me to the approach I use now, which is the best approach in my opinion. 3M makes a product (which I discussed and linked above) called “knifeless tape.” This is a thin piece of tape that has string built into it. You begin by applying the knifeless tape onto your body panel where you have a cut line. You then place your vinyl on top of that knifeless tape and onto your panel. After that, you separate the string from the knifeless tape and pull the string through the vinyl along your cut line. You are left with a perfectly straight vinyl cut that has not scratched or harmed your body panel in any way. Here is a YouTube video to a person cutting vinyl using this method, in case the above does not makes sense: How To Use Knifeless Tape – YouTube
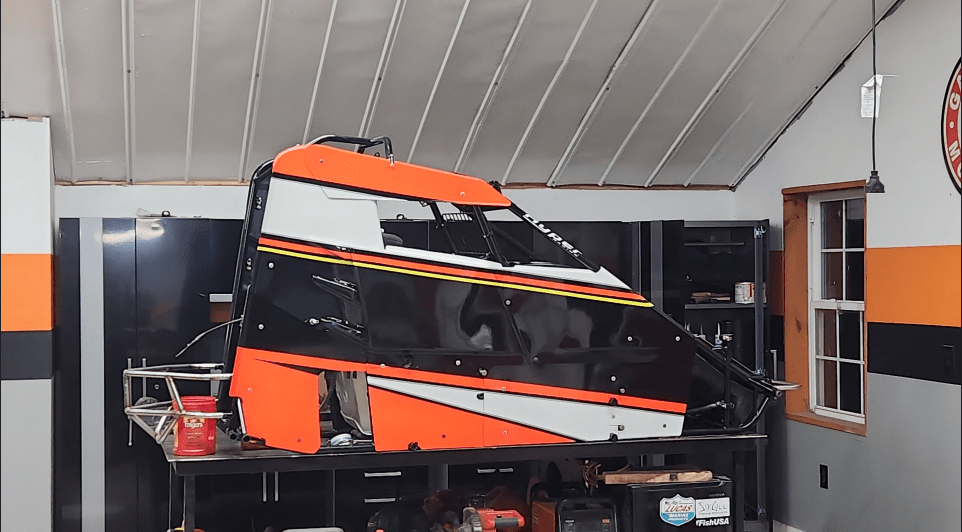
Here is a picture of my micro at the end of step 2. I didn’t have a picture of the XCEL at this stage, so sorry for that.
STEP 3 – CUTTING YOUR GRAPHICS AND APPLYING THEM TO THE CAR
By the end of step 2, the panels on the car are now showing their basic design! Now comes the fun part: applying your sponsor logos, numbers and everything else.
This process proceeds in five sub-steps:
(A) Design the Graphic:
Open your graphic software and draw your graphic. In many cases, your sponsors will be able to provide you with a “vector” logo, which means you don’t have to do this step at all.
(B) Cut the Graphic:
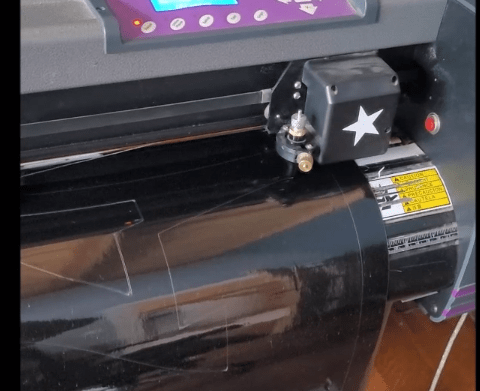
This is when you tell your design software to send the “cutfile” to your cutter. Then, you watch the cutter do its magic. The specifics of using cut software are beyond the scope of this article, but I’d be happy to help you get started if you are having trouble. Below is a quick video of my cutter going to work at the black portion of the number on my car.
(C) Weed the Graphic:
“Weeding” refers to removing the excess vinyl from the piece that you cut in sub-step (B) below. For example, if you are printing your number, you need to remove all the vinyl that will appear outside of your number cut. This leaves you only with the vinyl that forms a part of your graphic.
(D) Apply Transfer Tape:
After you have “weeded” your graphic, you apply clear transfer tape to the top. The transfer tape serves two purposes: first, it will remove the vinyl graphic from the paper backing that the vinyl is attached to when you buy it. Second, you will place the graphic on your car using the transfer tape (see below).
(E) Place Graphic on Car
When you are ready to use the transfer tape and apply the graphic to your car, measure, measure, measure!!! There is ABSOLUTELY nothing worse than when you spend an hour or more cutting, weeding and preparing your graphic to apply it to the car, only to find out that you put the graphic on off-center, crooked, or otherwise not where you want it. In that case, it will bother you forever and you will end up ripping the damn thing off and starting over. Trust me, I speak from experience.
The good thing is that if you purchase the transfer tape I recommended above, it is clear and you can draw lines using a pencil on top of the transfer tape. This will help you get the perfect alignment and fit for when you ultimately are ready to put the graphic onto your car.
MISCELLANEOUS TIPS
After having done this for a few years, I’ve learned a few tricks which I will share below in no specific order. I’m sure the professionals will disagree on some of these, but this is just what works for me:
(1) When applying vinyl into a crease (for example, the fold at the top of the XCEL door), I like to apply the vinyl on the flat surface first and work my way INTO the crease. This helps minimize the wrinkles.
(2) If you are cutting graphics that have multiple layers (for example, my number is one layer of white, topped with one layer of black), I find it easier to apply the base layer to your car first and then follow it with the top layer. The alternative method, which is try and layer the vinyl while it is still on the paper backing, doesn’t work as well for me and produces much more wrinkles.
(3) When “weeding” small letters, use your razor blade to weed from inside-to-outside. For example, if you are weeding a lowercase “t”, I will place my razor blade at the inside edge of the four corners in the cross of the “t” and pull that excess vinyl away from the “t”, rather than trying to pull from the outside in. If you try to work outside-to-inside, you’re going to pull the small letter up into your waste product and you’ll get extremely frustrated.
(4) Don’t get too fussed over wrinkles — Unless you apply vinyl for a living, you’ll get some wrinkles. It’s just unavoidable. Will your fans see them when you’re going down the backstretch 100+ yards away? Nope.
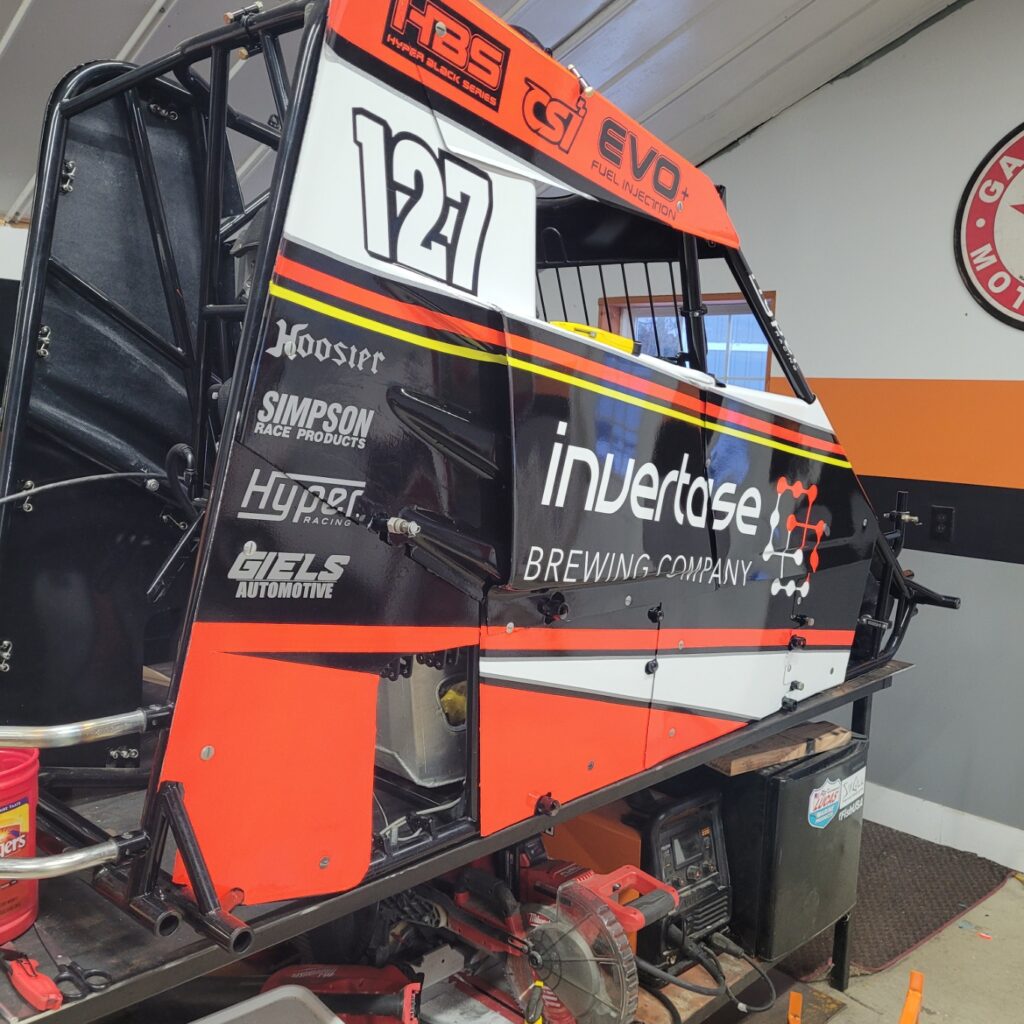
FINISHED PRODUCT AND CLOSING THOUGHTS
Hours and hours later, when you are all done, it is very rewarding to see the end product of your work. A picture of my cars are below.
Beyond having the satisfaction of doing your own car, it can be more cost efficient to letter a car yourself. I completed both of my cars this year for under $600 in material, less than $300 a piece. If you multiply those savings over a couple of seasons as compared to paying a professional, that will get you at least a couple of right rear tires!
GOOD LUCK!